My Mac mini is still running strong and I generally have no complaint, except for the slow internal HDD. All my other computers already use SSD. My work computer is 2015 iMac with Retina 5K with 2 TB Fusion Drive. My laptop is 2015 Macbook with 256 GB SSD. Switching from these machines to my main desktop computer at home does have a noticeable impact in read/write performance. At first, I considered to get a new Mac mini. However, my current Mac mini is powered by i7 processor and 16 GB RAM. Getting a brand new Mac mini with i7 processor, 16 GB RAM and large internal SSD would cost me a fortune. So I decided to upgrade my Mac mini using internal SSD.
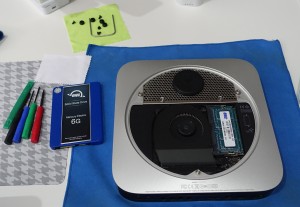 The first challenge in upgrading was to choose the internal SSD. Based on performance benchmark, Samsung 850 EVO SSD is probably the strongest candidate. However, further reading revealed that Mac computers don’t automatically turn on TRIM for third party SSD drives. I even read some issues with Mac and forcefully enabled TRIM. So, my next choice would be OWC Mercury Electra SSD which market itself as an SSD that doesn’t need TRIM. OWC is a brand that has long history in making Apple-compatible products, so I decided to trust them on this one.
Before the upgrade, one thing I decided to do is to prepare my new SSD ready to be used. Brand new OWC Mercury Electra SSD comes unformatted. So installing freshly unboxed OWC SSD into our Mac might cause a bit of extra work later. I got myself an external enclosure so I could format my new SSD and do Time Machine full restore to the new drive before even starting the hardware installation process. The idea is that right after hardware installation, I would like to be able to immediately check whether the process was successful or not.
I did the hardware installation following the guide provided by OWC (a book with pictures, along with a YouTube video I played using my iPad on my work desk). The guide stated that the whole process should take about 45 minutes. That’s a big lie, it took me solid 2.5 hours to complete the process.
First, you need clean working table. It needs to be reasonably big because you’re going to put a lot of components around and you need to quickly categorise them in a way easy to put back later. Next, the place needs to be somewhat free from dust and static electricity. As an extra step not mentioned in the video, I also use a table lamp for extra light, which was proven to be super useful.
Place the Mac mini upside down on flat surface. I used some large microfiber cloth as base to avoid scratches. Remove the bottom cover by slightly rotating it counter clock wise. Next remove the RAM modules.
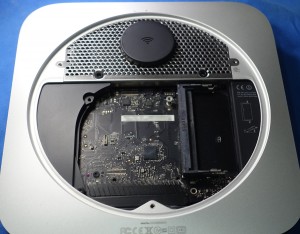 Remove the fan by unscrewing three Torx T-6 screws. Put these aside as a group because they need to be refastened later. Before completely removing the fan, be very careful when removing the cable connector. Next we need to remove the WiFi antenna cover by removing the 4 screws on it (Torx T-8). Then remove the one screw at the furthest point from the antenna cover. Gently life the cover. There is a cable connector on the left side, it needs special care to safely remove using nylon pry tool. Mine was particularly difficult because my Mac mini has been working hard for years and dust is already accumulated. The next thing to remove is the fan cowling on the left side. After the fan cowling is out, we can lift the HDD cable connector. As usual, use the nylon pry tool to remove the connecting cable.
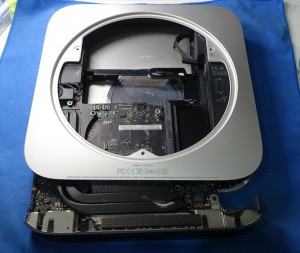 The following big step is to remove the logic board from the case. Before doing so, remove the Torx T-6 screw that holds the logic board to the chassis. Next we need to remove the IR cable connector. At this point, I realised that my Mac mini looks different from the video I was watching. Apparently I was watching the video for Mac mini 2011 model and my device is 2012 model. A quick YouTube search got me to the right video. Next, insert logic board removal tool to the 2 holes and push the logic board outside the case gently and slowly. I spent good 20 minutes on this because my logic board didn’t move at all. I was too afraid to use too much force, fearing it could damage my computer. After a lot of trials and errors, I discovered that the removal tool needs to be inserted at the right depth. Once the logic board moved a little bit, we need to detach power supply cable. This is another super challenging step for me because the location of the connector wasn’t clearly visible. After the power supply cable is detached, we can safely slide the logic board out of the chassis. The power supply needs to be out, too. We do this by removing the silver metal tab near the power connector, twist the power connector 90 degrees counter clock wise, then we should be able to smoothly slide it out.
 Once the logic board is out, we should be able to see the hard drive carrier. Remove the 2 Torx T-6 screws that hold the carrier onto the chassis, then remove the internal HDD from carrier. Remove the hard drive carrier from the chassis and install our new SSD in it using 4 rubber grommets. Putting these grommets was also harder than I initially thought, especially for 1 grommet with difficult location. Finally, insert hex head screws into the grommets to secure the SSD. Do not overtighten as it might damage the components.
The reassembly process started with putting back the hard drive carrier into the Mac mini. Put back the power supply, don’t forget to twist the power connector back to its locked position and place the metal locking tab. Next we need to put back and fasten the screws securing hard drive carrier onto the chassis. Slide back the logic board carefully. Reattach power supply cable before it reached fully inserted position. If you wish to keep using the original HDD, you will need to place it back to the chassis. This part took me good 30 minutes until I discovered the right angle to insert it. More experienced person would probably done this in few seconds.
 Next, we need to attach the hard drives cable connectors (now we have 2). Also we need to reattach the IR cable. Refasten the screw securing logic board to the chassis. Put back the fan cowling and refasten all its screws. Then we put back the antenna cover after we reattached the cable connector. Put back and gently fasten all its screws. Reconnect fan cable and put the fan back onto its place, fasten all its screws. Put back the RAM modules. Put the Mac mini bottom cover. We’re done.
The next scary thing is to reattach the power cable and our monitor, then find out if everything goes alright and our machine works as expected. If your old internal drive was normal HDD, you should soon notice significant performance improvement with SSD. Since I have completed the Time Machine restore process before installing hardware, my new SSD is already bootable. The last step to do was to perform Time Machine backup again, then format the old drive.
Leave A Comment